Trucs & Astuces
Patins glissants
Nettoyage plateau
Changer un circuit intégré
Support de piles
Support lampe Bumper
Retirer un PLCC / ASIC WPC
Son qui grésille sur WPC95
Mise ŕ jour Stern via USB
Réparer une cible lumineuse
Réparer une tęte animée
Réparer une guirlande animée
Flippers
(par ordre alphabétique)
Alien Poker
Apollo 13
Attack from Mars!
Beat Time
Blackout
Bone Busters Inc.
Congo
Creature from the Black Lagoon
Elvira and the Party Monsters
Funhouse
Guns n'Roses
Indiana Jones
Indianapolis 500
Junk Yard
Jurassic Park
Last Action Hero
No Good Gofers
Medieval Madness
Monster Bash
Operation: Thunder
Pin·Bot
Pinball Magic
Revenge From Mars
Ripley's Believe It or Not
Road Show
RollerCoaster Tycoon
Safe Cracker
Scared Stiff
Shrek
Spectrum
Spider-Man
Star Trek 25th Anniversary
Star Trek The Next Generation
Star Wars
Star Wars Episode I
Stargate
Tales of the Arabian Nights
Terminator 2: Judgment Day
The Champion Pub
The Getaway: High Speed II
Theatre of Magic
The Flintstones
The Lord of the Rings
The Machine: Bride of Pinbot
The Simpsons Pinball Party
Torpedo Alley
Twilight Zone
Victory
White Water
Arcade, Fléchette
Cobra Tour Sport Dart
Pinball Action
Borne Mame
Juke-box
Seeburg Firestar
NSM Hit 120 I
Pachislo
Home-Ciné
(plus trop ŕ jour...)
Écran Fixe
Égalisation Caisson
FreqResPlot
CorrectPlot
Divers
Frequency Response Plotter 1.12a
( Cliquez ici Pour l'aide en Français. )Download
FreqRespPlot112a.zip (version 1.12a, April 5, 2003)History
- Version 1.12a:
- Various Bug Bixes and Real Time signal generator added + bad signal detection. The English help is a bit out of date now.
- Version 1.10:
- Calibration file support for sound card and user defined.
- Added 'C' response curve correction for SPL.
- Added Load/Save Curve.
- Curve smoothing.
- Added 1/3 and 2/3 octave Iso bands and user frequency list file.
- Added input saturation detection
- Added Signal to Noise ratio display
- Splitted user interface into resizable windows
- Clear and Recalibration now separated.
- Version 1.00:
- Added Fast Fourier Transform (FFT) in trace mode and single shot mode
- Added Automatic Calibration
- Vertical curve axis now in dB
- Removed 'ploc' between samples
- Support old 44.1 kHz only sound cards
- Added '?' button
- Version 0.00a: pre-release given to members of the French Home-Cinema mailing list
Installation
Extract zip content to a temporary folder and launch 'Setup'. To uninstall this tool, go to the windows control panel and click 'Add/Remove Programs'. WARNING: It seems that this tools doesn't work with Windows 98, but work well on Windows Me, 2000 and XP.What is it ?
This tool was written to automatically draw static response time of an audio system, thus avoiding the lazy use of a spécial CD and drawing by hand the results of the SPL meter to a paper.
My main objective was to correctly setup my subwoffer, but you may find this tool usefull for someting else.
This tool is a freeware and provided 'as is' with no warranty of any kind !
Limitations
This tool is tributary of the sound card, microphone, etc quality, which is poor in general.Don't expect perfect measures, especially above 10kHz. But this tool gives a good idea of the response of your bass system, great, that's the purpose of it :-)
Quick Start
2 cases:
If you are using a SPL-meter: use a cinch to 3.5mm jack and connect the cinch to the SPL meter and the jack to the sound card 'LINE IN'. Setup windows record parameters to 'LINE-IN' and set record level to max.
- If you are using a Microphone: plug the mic to the sound card 'Mic IN'. Setup windows record parameters to 'Microphone' and set record level to max. Check the 'Mic Boost (+20db)' option if your sound card provides this feature and the record level is too low.
Start the Frequency Response Plotter, you'll see this window:
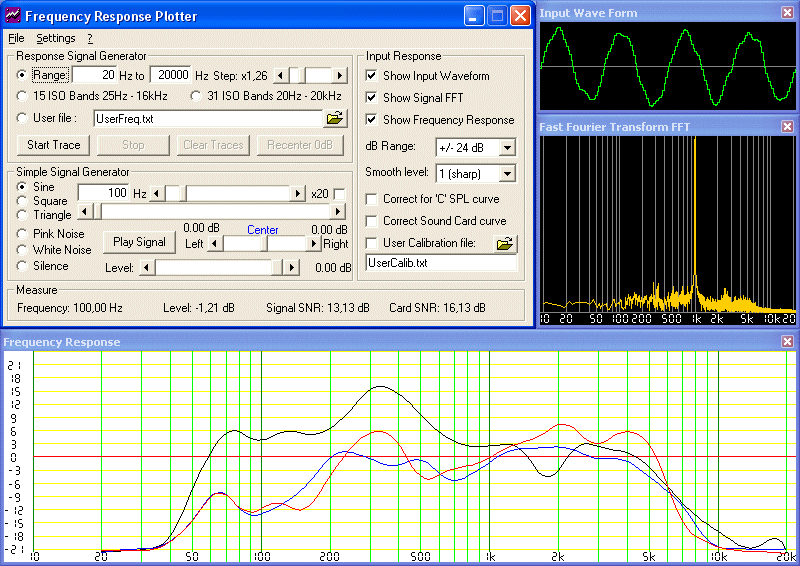
Select the Start and Stop frequencies from 10Hz to 24kHz (default is 20Hz-20kHz), and click on 'Start'. The program will proceed to a quick white noise calibration, if it fails, raise the volume or the record level and check your connections. Wait a bit, each point takes 1sec to acquire.
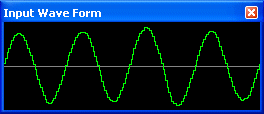
You'll see a portion of the 'input waveform' as recorded:
Below is the frequency response curve, frequencies are displayed in Log format (Bode plot).
When acquiring with a SPL-meter, ensure the spl meter is not at the maximum level (above +6db), if this occurs, press 'Stop', choose a higher range on the SPL (+10dB), click on 'Clear' and 'Recalibrate' and then Trace again.
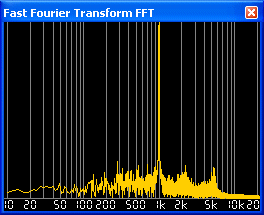
If you detect a something strange at certain frequencies (bump, hole, strange waveform, ...), you may show the FFT for that specific frequency: Select single shot mode, move the slider or fill the Single Shot mode frequency and click on 'Start', example of a 1kHz FFT:
Sound Card Calibration
As you know, the intrinsic response curve of the sound card is never perfectly flat, because of bass/treble level and input/output capacitors. Calibrating the sound card is mandatory to make accurate measures.
To build calibration file, use a loop cable and connect the output to the card input. If you're using a Mic, beware that Mic entry is a very low signal input, so lower output volume to avoid saturation.
Of course disable any fancy feature like 3D enhancing, EAX Fx and so on, and set bass and treble to default values (cursors in the middle of the sliders). Of course each time you change bass/treble level, you have to rebuild the calibration file.
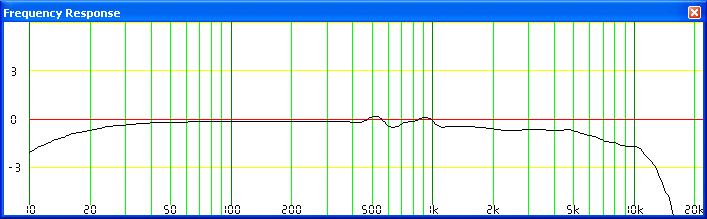
Before building sound card calibration file, uncheck any other correction (No user file and no SPL correction). Set start frequency to 10Hz, stop to 24000 and step 1.1 or less for a precise correction file. Hide FFT window to speedup a bit. The sound card response curve will look like this:
After the response curve is finished, click 'Save' and name the file 'SoundCard.txt' in the FreqResPlot directory. That’s it, now further measures will be corrected by checking 'Correct Sound Card'.
If you wish to check you calibration file, let the loop cable in place, check 'Correct Sound Card' and start the trace again: the new response should be perfectly flat (until approx 15kHz, after that the measures are not very accurate).
User calibration file
If you're using a Mic or anything else that you know the response curve, you can build your own calibration file for that device. Edit a text file and simply put "Frequency,dblevel" in the file, one couple per line and ordered by frequency, for example:
10, -12.4
20, -6.5
31.5, -3
40, -3
80,0
100,1.2
2 extra files 'Modified SPL Fast.txt' and 'Modified SPL Slow.txt' are given as example of user files. Theses files are usefull for me because i'm using a modified version of the Radio Shack SPL meter using the Fast or Slow button. The modification I made is taken from Eric Wallin web page: RS SPL METER (33-2050) MODIFICATIONS.
User Frequency list file
If you want to use personal frequencies to build a curve, you can edit a text file and put each Frequency, one per line, ordered:
10
12.5
16
20
25
Note: you can use calibration file as frequency file, even if db data are present, they'll be ignored. It's useful for example to draw a response curve matching frequencies of the sound calibration file.
Multiple curve support
You may have up to 8 curves at once on the response window, each curve a different colour. When the 8 curve limit is reached you can't load any curve or make measure, only the single frequency mode is available. Click on 'Clear' to clear response windows and reset curve count.Load/Save feature
You can save the last curve into a file or load a file into a new curve, pretty useful to make comparison even after days, computer crash, etc.
The file format is always the same, a text file with Frequency,dBlevel couple, one per line. You can import these files to Excel to draw beautiful graphics, when importing simply check the 'Comma' delimiter in the text import wizard.
Curve smoothing
By default the smoothing level is set to '1 (sharp)', you may change this to have a smoother curve by selecting '2 (light)' or more, or simply draw lines between measure points by selecting '0 (none)'.SNR (Signal to Noise Ratio)
In the measure section you'll see the last measure: frequency, relative dblevel, signal SNR and Card SNR.The Card SNR is an estimation of the overall SNR of the entire system, including sound card, microphone, etc. It's computed only once when calibrating. Good value should be above 40db, if this value is lower than 10db the calibration fails. Perfect sound card will show a 90db SNR, but reaching 60db is already an exploit :-)
The signal SNR is the recorded signal/noise for each point of measure.
Other Options:
The step slider is the base frequency multiplier for each point, move left for a precise curve (longer), to the right for a quick preview (faster).
The dB Range sets minimum and maximum levels, each yellow line mean a 3dB diff.
If you sound card doesn't support 48kHz sampling rate, select the 44.1kHz button.
The response curve is not erased, so you may change your system setup (sub woofer position, level or phase for example) and restart the Trace to see changes.
Author
For any questions, bug report, or whatever :-)Pascal Pensa
freqresplot@wanadoo.fr